Are you a game artist?
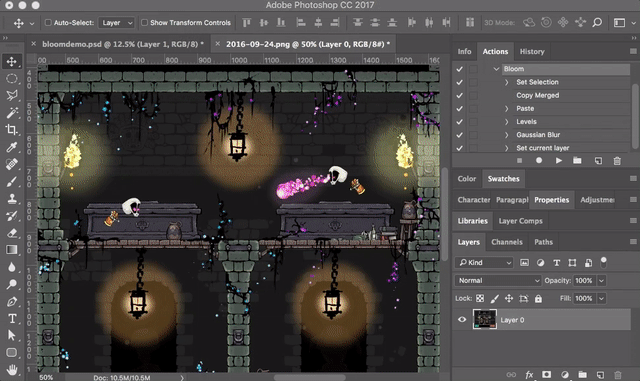
I often create art but then wonder what it’ll look like with post processing effects such as Bloom. Bloom is not a single effect, it’s actually a stack of 3 effects in 4 passes. Here’s how Bloom is created:
- Engine renders the scene to a buffer
- A copy of the buffer is made and an “extract” filter is applied (pass #1). The extract filter makes the darks much darker and the highlights very bright, thus “extracting” the light parts of the scene.
- The copy of the buffer is then gaussian blurred. The amount of blur determines how much light halo the bloom has. Blur is two passes, horizontal and vertical.
- Finally, the copy is Additively blended with the original to produce the final scene. The opacity of the copy during this process determines how strong the bloom effect is
You can simulate this in Photoshop by:
- Making a copy of your whole scene just like the game engine would:
- CTRL + A to select all
- CTRL + SHIFT + C to copy merged
- CTRL + V to paste a new flattened layer
- Extract highlights:
- CTRL + L to open levels
- Adjust both edges towards the middle until darks are very dark and lights are very light
- Filter > Blur > Gaussian Blur (pixel amount determines halo)
- Change Layer Blend Mode to “Linear Dodge (Add)”
- Adjust opacity to suit
This is time consuming so I created a handy action that you can run to have a Bloom simulation layer very quickly!
Download a zip file with the photoshop actions below or learn more about Photoshop Actions.
1 Comment
Peyton Stephenson · December 12, 2019 at 8:29 pm
Worked like a charm, thank you very much Justin.